
Lists can be a vital part of documents that contain large quantities of information. These lists help present information in an easier-to-read format, and this makes them useful in many types of professional documents. You should know that LaTex allows you to create extensive lists using bullet points.
Let’s look at the different ways to use LaTeX bullet points and create lists.
Table of Contents
Creating a Simple List
LaTeX allows you to make many different types of lists. The simplest way to create a list with LaTeX bullet points is by using the following format:
\begin{itemize}
\item {LIST ENTRY TEXT}
\end{itemize}
An example of this is shown below:
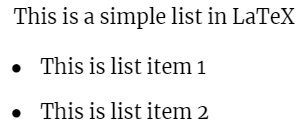
This is a simple list in LaTeX
\begin{itemize}
\item {This is list item 1}
\item {This is list item 2}
\end{itemize}
When compiled, the end result should resemble:
In the above example, we created an unnumbered or unordered list by creating an itemize environment and inserting the list entries inside. Once this itemize environment is created, each list item should be preceded by the command \item, which shows them alongside a bullet point. An unordered list can be useful when working with bullet points that do not require a sequence.
Creating a Numbered List
In some cases, you may need to create a numbered list to represent items in a more orderly fashion. This is useful for showing steps or sequences. You can create a numbered list with LaTex bullet points with the same code we used before, except with \begin{enumerate} and \end{enumerate} around the list items instead of \begin{itemize} and \end{itemize}.
For example:
\begin{enumerate}
\item This list item is preceded by the number 1
\item This list item follows a number greater than the one before it
\end{enumerate}
When compiled, the result resembles:

As you can see, the above example shows each list item numbered. These lists always order the first item with a “1”, the second with “2”, and so forth.
Adding Nested lists
In some cases, you may need to add a sublist inside another list. You can keep adding sublists until you reach a depth of four. Such lists are useful for showing items within items. An example of how to do this is shown below:
\begin{enumerate}
\item This is the first numbered item in the list.
\begin{itemize}
\item This is an unnumbered item in the sublist.
\item This is another unnumbered item in the same sublist.
\end{itemize}
\item This is the second numbered item in the list.
\end{enumerate}
When compiled, the list should resemble the following

Using Different List Styles
In the above example, we showed how to use numbered lists alongside unnumbered ones. However, LaTeX actually allows you to use many different types of bullet points within a single list. You can generally use LaTeX bullet points with the following styles:
- Arabic numbers such as 1, 2, 3… for the first level
- Lowercase letters such as (a), (b), (c)… for the second level
- Lowercase Roman numerals such as i, ii, iii…for the third level
- Uppercase letters such as A, B, C…for the fourth level
If we were to create a list that includes all four levels, the code would resemble:
\renewcommand{\labelenumii}{\Roman{enumii}}
\begin{enumerate}
\item This item is in the first level
\item This item is in the first level
\begin{enumerate}
\item This item is in the second level
\item This item is in the second level
\begin{enumerate}
\item This item is in the third level
\item This item is in the third level
\begin{enumerate}
\item This item is in the fourth level
\item This item is in the fourth level
\end{enumerate}
\end{enumerate}
\end{enumerate}
\end{enumerate}
Notice that list begin with the command: \begin{enumerate}
When compiled, the list should resemble the image below:

In the above example we used the command \renewcommand{\labelenumii}{\Roman{enumii}} to switch to the level that contains uppercase Roman numerals. If you wanted to change the labels for any of the levels you would replace labelenumii in the above code to:
- \theenumi to change the label for Level 1
- \theenumii to change the label for Level 2
- \theenumiii to change the label for Level 3
- \theenumiv to change the label for Level 4
The above commands should be placed in the preamble if you wish to alter the labels globally. Alternatively, you can add them right before the command \begin{enumerate} you want to change the labels for just the list accordingly.
\renewcommand{\labelenumii}{\Roman{enumii}}
\begin{enumerate}
\item This item is in the first level
\item This item is in the first level
\begin{enumerate}
\setcounter{enumii}{4}
\item This item is in the second level
\item This item is in the second level
\begin{enumerate}
\item This item is in the third level
\item This item is in the third level
\begin{enumerate}
\item This item is in the fourth level
\item This item is in the fourth level
\end{enumerate}
\end{enumerate}
\end{enumerate}
\end{enumerate}
This produces a list that resembles the image below:

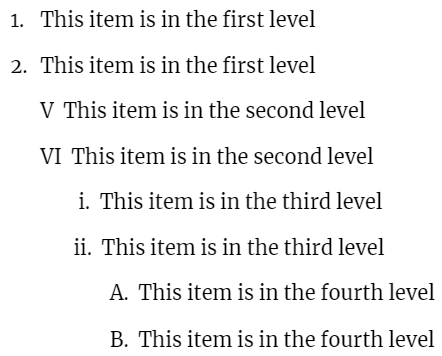
In the above example we changed the starting number of the levels using the command \setcounter. We altered the list numbers for the second level to start from V by using \setcounter{enumii}{4}. It is possible to change the start number for each level of LaTeX bullet points using the following commands:
- enumi to change the number for Level 1
- enumii to change the number for Level 2
- enumiii to change the number for Level 3
- enumiv to change the number for Level 4
Final Thoughts
As you can see, there are plenty of ways to create lists using bullet points in LaTeX. The steps mentioned above are quite straightforward once you understand the commands involved. When used correctly, it is possible to create some complex lists that present your information in a clear and concise manner. So try adding some useful lists to your next LaTeX document.
Frequently Asked Questions
Q3. How Do I Make a Numbered List in LaTeX?Q1. How Do You Make Bullet Points in LaTeX?
You can make LaTeX bullet points using the code structure:
\begin{itemize}
\item {LIST ENTRY TEXT}
\end{itemize}
Q2. What Are the Lists Available in LaTeX?
You can make bulleted lists, ordered lists, and descriptive lists in LaTeX. LaTeX bullet points alone offer many different list options
Q3. How Do I Make a Numbered List in LaTeX?
You can make numbered lists in LaTeX using the code structure:
\begin{enumerate}
\item This is the first item in the numbered list
\item This is the second item in the numbered list
\end{enumerate}
Q4. How Do You Indent a List in LaTeX?
You can add additional depth to your list by first using the command \begin{enumerate} and then ending the code with \end{enumerate} for each level. Such LaTeX bullet points show up with different idents to indicate different depths.
Q5. What to do if I still have issues with the LaTex types of lists?
We find sites like Wikibooks and the Tex.StackExchange helpful.
Further Reading
LaTex Tutorial
- 27 Pros and Cons of Using LaTex for Scientific Writing
- 6 easy steps to create your first Latex document examples
- How to add circuit diagrams in Latex
- How to change Latex font and font size
- How to create a Latex table of contents
- How to create footnotes in LaTeX and how to refer to them, using the builtin commands
- How to create Glossaries in LaTeX
- How to create plots in Latex – codes and examples
- How to create symbols in LaTeX – commands for Latex greek alphabet
- How to create tables in LaTeX – rows, columns, pages and landscape tables
- How to drawing graphs in Latex – vector graphics with tikz
- How to highlight source code in LaTeX
- How to insert an image in LaTeX – Managing Latex figure and picture
- How to make hyperlink in latex – Clickable links
- How to reference in Latex – 5 steps to bibliography with Bibtex
- How to use Latex Packages with examples
- How to use LaTeX paragraphs and sections
- LaTeX Installation Guide – Easy to follow steps to install LaTex
- Learn to typeset and align Latex equations and math